As you all probably know by now, Gmail now supports IMAP access for all e-mail accounts for free. IMAP is great because it allows you to sync your emails between multiple computers, devices or e-mail clients.
There are two ways you can configure your KMail e-mail client for accessing Gmail account through IMAP – the IMAP as it is and Disconnected IMAP (dIMAP). The difference between the two mentioned IMAPs is that first one requires you to always have internet connection (be online), and a fast one when you have tonnes of e-mails, whenever you want to read/manage your account, as it fetches/syncs e-mails directly from the server (GMail server in this case). The second option, dIMAP, is used to achieve the same result that Thunderbird does, known as “cache IMAP” – having all your e-mails stored locally on your computer, allowing you access to offline reading and management, which on your next check mail command will sync it with your GMail account.
You can create both type of accounts and use them simultaneously for a time being and later decide which better suits your need. I personally prefer dIMAP.
Before we start, here is what you need to have for IMAP/dIMAP to work:
I. Enaabling IMAP in Gmail:
1. Login to your G-Mail account. In the upper right hand corner, click Settings.

2. Navigate to the Forwarding and POP/IMAP tab.

3. Mark the circle for Enable IMAP in the last section and then Save Changes.

II. Configuring KMail IMAP:
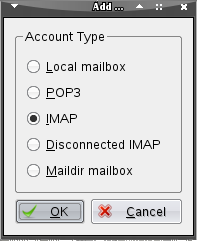
1. Head to Settings -> Configure KMail -> Accounts -> Add:
2. Mark IMAP in dialog that appears.
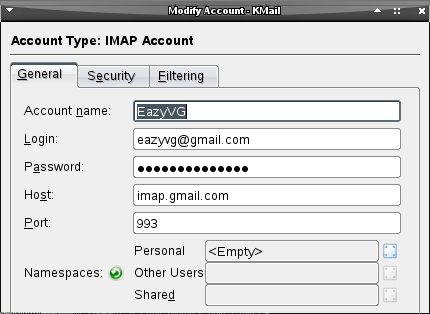
3. Now here are the fields that you must change under the General Tab:
- Login: Type in your full e-mail address, including gmail.com
- Host: Type in imap.gmail.com
- Port: 993
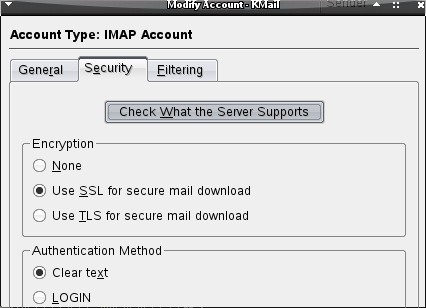
4. Under the Security tab of the same window, mark Use SSL for secure mail download under Encryption and Clear Text as method:
Now, next time you retrieve mail, you should find your new GMail IMAP account under the mail tree. Keep in mind that it may be a bit slow to get everything downloaded if you have a lot of mail.

III. Configuring KMail with dIMAP:
1. Head to Settings -> Configure KMail -> Accounts -> Add:
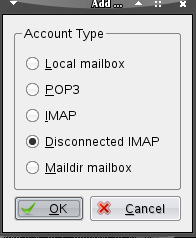
2. Mark Disconnected IMAP in dialog that appears.
3. Now here are the fields that you must change under the General Tab:
- Login: Type in your full e-mail address, including gmail.com
- Host: Type in imap.gmail.com
- Port: 993
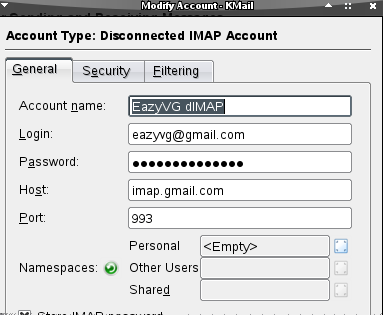
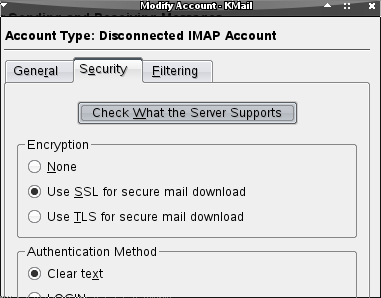
4. Under the Security tab of the same window, mark Use SSL for secure mail download under Encryption and Clear Text as method:
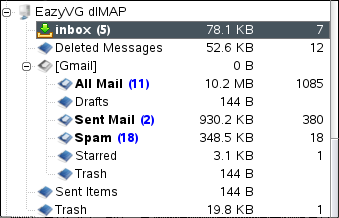
Now, next time you retrieve mail, you should find your new GMail dIMAP account under the mail tree. Keep in mind that it may be a bit slow to get everything downloaded if you have a lot of mail, but as with the first option, where you are using only IMAP feature of KMail, once all downloaded, later it will be faster, as all your mail is cached on yor local hard drive (make sure to check Tips section at the bottom).
IV. Setting up Outgoing Mail (SMTP):
This remains the same:
| Outgoing Mail (SMTP) Server – requires TLS: | smtp.gmail.com (use authentication) Use Authentication: Yes Use STARTTLS: Yes (some clients call this SSL) Port: 465 or 587 |
| Account Name: | your Gmail username (including @gmail.com) |
| Email Address: | your full Gmail email address (username@gmail.com) |
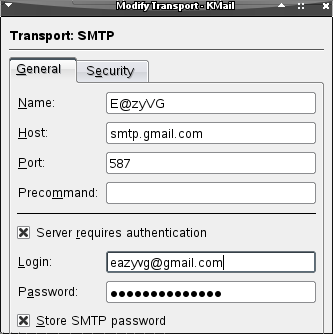
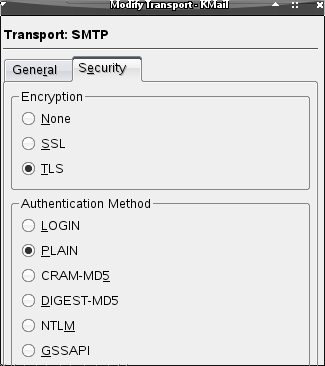
There you go …. all set up and ready to go.
Tip to Notice with dIMAP: You can’t unsubscribe from the folders on the server. This implies that you have to subscribe to the ‘all mail’ folder. This really slows everything down if you use disconnected imap (which means that all messages are stored also locally). As in the web interface ‘all mail’ contains all your ever send or received mails (as long as you don’t delete them or report them as spam). This means that you have to download everything twice! Fortunately there is an option for some e-mail clients to differentiate between imap-folders subscripted server-side and imap-folders subscripted local. This makes it possible simply to ignore the ‘all mail’ folder in your e-mail client while it still exists on the server.
Here are settings that can be used with KMail 1.9.x (don’t use earlier versions if you want to unsubscribe ‘all mail’ locally!):
- Go to the settings for incoming accounts and check the option “show only locally subscribed folders”.
- Click with your right mouse button at your [GMail] or [Google Mail] folder and choose “local subscriptions…”. Uncheck here every folder you don’t want to see. Additionally to the ‘All Mail’ folder I have also unchecked the trash folder, since I use the local trash folder anyway. This makes sense as long as you don’t need your deleted mails on several locations.
Tips: If you really want to nuke the IMAP cache of all IMAP accounts then delete everything in ~/.kde/share/apps/kmail/imap/.
Tips: It is a good idea to use KWallet to store all your e-mail account(s) password(s) … and for the rest of the KDE apps as well.
Pingback: Cómo Configurar KMail para gestionar cuentas de correo Gmail con IMAP y Disconnected IMAP : KDE Blog
Pingback: Kmail only load spam and trash folder
thanks a lot! this is what i was looking for! keep it updated 🙂